Kentsmith9 (talk | contribs) m (Text replacement - "Category:Style guide" to "Category:Style guides") |
(Complete rework of page to reflect current standards) |
||
| Line 1: | Line 1: | ||
{{ReturnTo | Junction_Style_Guide | the Junction Style Guide}} | {{ReturnTo | Junction_Style_Guide | the Junction Style Guide}} | ||
| Line 14: | Line 4: | ||
=== Right angles === | === Right angles === | ||
[[File:3way90.png|200px|frameless|right]] | |||
| | |||
The simplest junctions often resemble a "T" and are considered diverging or branch roads. The branch road will normally meet the main road at nearly a 90 degree angle. This is the simplest situation to map, as the physical and logical views of the roads match up well. | The simplest junctions often resemble a "T" and are considered diverging or branch roads. The branch road will normally meet the main road at nearly a 90 degree angle. This is the simplest situation to map, as the physical and logical views of the roads match up well. | ||
{{clear}} | {{clear}} | ||
=== | === Skewed angles === | ||
[[File:3wayskewed.png|200px|frameless|right]] | |||
Some roads meet at skewed angles. These intersections should be mapped to reality. Mapping these to reality can result in turn instructions that would not match what the driver expects. Thus, at these intersections it is important to check the geometry, road types, and names to understand what instructions are given. If the default instruction is not desirable then a [[Voice_prompt|voice prompt]] override should be used. | |||
| | |||
* Depending on the angle, the client may give a "keep right or keep left" instruction to the driver when a "turn right or turn left" instruction is more appropriate. If Minor Highways or above are involved, you will actually get an "''Exit'' Right" which can be confusing in many situations. | |||
Some roads meet at | * In some cases, no instruction will be given at all. | ||
* Depending on the angle, the client may give a " | The [[Junction_Style_Guide/Controlling_turn_instructions|controlling turn instructions]] article has more information on the specifics of geometry, road types and names and how they affect turn instructions. | ||
* In some cases, no instruction will be given at all. | |||
{{clear}} | {{clear}} | ||
====Doglegs==== | |||
{| class="Wikitable floatright" | {| class="Wikitable floatright" | ||
| [[Image: | | [[Image:3waydogleg12m.png|border|x200px]] | ||
| [[Image:3waydogleg12m-2.png|border|x200px]] | |||
|} | |} | ||
Doglegs can be added to better represent reality or aid in turn instruction timing where the large area of pavement should consider turns from all directions. When doglegs are added the first [[geometry node|geometry handle]] should be placed a minimum of 12m (40ft) from the intersection node when measured with the [[Map_Editor_Interface_and_Controls#Ruler|ruler]]. | |||
{{clear}} | {{clear}} | ||
A deprecated method to control instructions at these intersections involved adding micro-doglegs (geometry handles placed very close to the node) to create geometry that would give the desired turn instruction. These intersections should be updated, micro-doglegs should be removed, and [[Voice_prompt|voice prompt]] overrides should be added if necessary. | |||
=== Steep angles with exits and keep right or left === | |||
The straight ahead path should be more or less straight, with a smooth transition. | |||
The diverging path should be configured as follows: | |||
[[ | *First, place the first [[geometry node|geometry handle]] of the diverging segment at the gore point (or "theoretical gore", i.e., where the painted lines diverge). | ||
[[File:Steep angles.png|200px|frameless|right]] | |||
*Next, grab the node itself, where the segments meet, and adjust the geometry of the diverging path as follows: | |||
**If the actual path diverges from the inbound path by less than 20°, adjust the node to create a 20° departure angle. This will allow for consistent timing of instructions and make it easier to report closures in the Waze client. | |||
**If the actual path of the road diverges immediately from the inbound path by more than 20°, adjust the node such that the road path follows its true natural departure angle. | |||
*Next, ensure that the last geometry handle before the node is at least 40 feet ahead of the node, and that the second geometry handle on the diverging path is at least 40 feet beyond the first geometry handle. | |||
*Finally, check the turn instructions for both paths according to [[Junction_Style_Guide/Controlling_turn_instructions|controlling turn instructions]] and if necessary add [[Voice_prompt|voice prompt]] overrides for the desired instruction. | |||
{{clear}} | {{clear}} | ||
[[ | ===Name changes on continuing path=== | ||
[[File:Name changes on continuing path.png|300px|thumb|right|Map these intersections according to the principles in this article and use voice prompt overrides as necessary for the proper turn instructions.]] | |||
For conditions where the through route changes road names, it is important to identify which segment is drawn as the continuing route and which is shown as the deviation from the main road. As the [[How_Waze_determines_turn_/_keep_/_exit_maneuvers|How Waze Determines turn/keep/exit maneuvers]] page explains, segment names and geometry are very important in determining what navigation instructions are given. Map these intersections according to the principles in this article and use voice prompt overrides as necessary for the proper turn instructions. | |||
{{clear}} | {{clear}} | ||
== Four-way == | == Four-way == | ||
=== Right angles === | === Right angles === | ||
[[File:4way90.png|200px|frameless|right]] | |||
The second simplest junction category is a "+" or "cross" four-way junction that intersects at 90 degrees. These roads are simple to map as the logical and physical views of the roads match up well. | |||
| | |||
The second simplest junction category is a "+" or "cross" four-way junction that intersects at 90 degrees. These roads are simple to map as the logical and physical views of the roads match up well | |||
{{clear}} | {{clear}} | ||
=== | === Skewed angles === | ||
[[File:4way90skewed.png|200px|frameless|right]] | |||
Similar to diverging roads that intersect at skewed angles, crossing roads can do the same thing. These intersections should be mapped to reality. Mapping these to reality can result in turn instructions that would not match what the driver expects. Thus, at these intersections it is important to check the geometry, road types, and names to understand what instructions are given. If the default instruction is not desirable then a [[Voice_prompt|voice prompt]] override should be used. | |||
Similar to diverging roads that intersect at | |||
* Depending on the angle, the client may give a "keep right or keep left" instruction to the driver when a "turn right or turn left" instruction is more appropriate. If Minor Highways or above are involved, you will actually get an "''Exit'' Right" which can be confusing in many situations. | |||
* In some cases, no instruction will be given at all. | |||
The [[Junction_Style_Guide/Controlling_turn_instructions|controlling turn instructions]] article has more information on the specifics of geometry, road types and names and how they affect turn instructions. | |||
[[ | |||
{{clear}} | {{clear}} | ||
A deprecated method to control instructions at these intersections involved adding micro-doglegs (geometry handles placed very close to the node) to create geometry that would give the desired turn instruction. These intersections should be updated, micro-doglegs should be removed, and [[Voice_prompt|voice prompt]] overrides should be added if necessary. | |||
== {{anchor|Split road intersections}}Divided road intersections== | == {{anchor|Split road intersections}}Divided road intersections== | ||
Many of the principles stated above apply to intersections between divided roads. Usually, divided road intersections should look like the traffic lanes they represent. "Box" shaped intersections are easiest to draw, maintain, and to explain to other editors. Only use variations when they are needed | Many of the principles stated above apply to intersections between divided roads. Usually, divided road intersections should look like the traffic lanes they represent. "Box" shaped intersections are easiest to draw, maintain, and to explain to other editors. Only use variations when they are needed or called for by regional / state guidance. | ||
=== Box and partial box intersections === | === Box and partial box intersections === | ||
Box and partial box intersections are also referred to as # and H intersections in the Waze editor community. These intersections should be mapped as close to reality as possible. The below style guide addresses some unique circumstances. | |||
When creating three way and four way intersections, if the cross street changes names at the junction, make sure that the median segment(s) have no name. This will cause the segment to inherit the appropriate name depending on the direction of travel. The median segment will not be included when you choose "Select entire street". Conversely, leave the median segment(s) named if the street maintains name continuity through the intersection. | |||
When creating three way and four way intersections, if the cross street changes names at the junction, make sure that the segment(s) have no name. This will cause the segment to inherit the appropriate name depending on the direction of travel. | |||
{| class="wikitable" | {| class="wikitable" | ||
| Line 138: | Line 75: | ||
! Intersection style !! Example | ! Intersection style !! Example | ||
|- | |- | ||
| A divided road intersecting a divided road. || [[Image: | | A divided road intersecting a divided road.|| [[Image:Divided road intersecting a divided road.png|300px]] | ||
|- | |||
| A divided road intersecting a 2-way road.|| [[Image:Divided road intersecting a 2-way road.png|300px]] | |||
|- | |||
| A transitioning (divided-2-way) road intersecting a 2-way road.|| [[Image:Transitioning (divided-2-way) road intersecting a 2-way road.png|300px]] | |||
|- | |||
| A transitioning (divided-2-way) road intersecting a divided road. || [[Image:Transitioning (divided-2-way) road intersecting a divided road.png|300px]] | |||
|- | |||
| A transitioning (divided-2-way) road intersecting a transitioning (divided-2-way) || [[Image:Transitioning (divided-2-way) road intersecting a transitioning (divided-2-way).png|300px]] | |||
|- | |||
| A divided road T at a 2-way road. || [[Image:Divided road T at a 2-way road.png|300px]] | |||
|- | |- | ||
| A divided road | | A divided road T at a divided road. || [[Image:Divided road T at a divided road.png|300px]] | ||
|- | |- | ||
| A | | A divided road T at a 2-way road transitioning to a divided road. || [[Image:A divided road T at a 2-way road transitioning to a divided road.png|300px]] | ||
|- | |- | ||
| A transitioning | | A 2-way road T at a 2-way road transitioning to a divided road. || [[Image:2-way road T at a 2-way road transitioning to a divided road.png|300px]] | ||
|- | |- | ||
| Be careful with your geometry – following the center of the actual road too closely can lead to rather high turn angles, and therefore possibly unwanted turn instructions. Keep it smooth. || [[Image: | | Be careful with your geometry – following the center of the actual road too closely can lead to rather high turn angles, and therefore possibly unwanted turn instructions. Keep it smooth. Departure angles on the transitioning segments should be less than 15°. || [[Image:Be careful with your geometry.png|300px]] | ||
|} | |} | ||
| Line 152: | Line 99: | ||
{{Anchor|Bowtie}} | {{Anchor|Bowtie}} | ||
[[File:Jct_bowtie.png|301px|thumbnail|right|The bow tie intersection is NOT RECOMMENDED]]The bow tie intersection is no longer the best way to take control of turns and traffic at divided-road intersections. It is an unrealistic representation of an intersection and drivers report map errors based on this appearance. It was necessary before the introduction of the [[junction box]] | [[File:Jct_bowtie.png|301px|thumbnail|right|The bow tie intersection is NOT RECOMMENDED]]The bow tie intersection is no longer the best way to take control of turns and traffic at divided-road intersections. It is an unrealistic representation of an intersection and drivers report map errors based on this appearance. It was necessary for controlling turns and accurately reflecting traffic queuing before the introduction of the [[junction box]], but now there are better methods to control turns and properly account for queuing. | ||
* Where Waze seems to be doing a poor job of keeping track of traffic queuing, a junction box is recommended. | * Where Waze seems to be doing a poor job of keeping track of traffic queuing, a junction box is recommended. | ||
* To | * To prevent U-turns at intersections use a junction box. | ||
* Do not add new bow ties to the map. | * Do not add new bow ties to the map. | ||
* When you find a bow tie intersection on the map, check if it can be replaced by a realistically drawn intersection using other techniques to control turns and traffic. | * When you find a bow tie intersection on the map, check if it can be replaced by a realistically drawn intersection using other techniques to control turns and traffic. | ||
* If you think it is necessary to add a bow tie to the map, contact state managers to discuss the intersection. They will most likely recommend a better approach. | * If you think it is necessary to add a bow tie to the map, contact state managers to discuss the intersection. They will most likely recommend a better approach. | ||
* A bowtie intersection may be necessary at 5-point or greater intersections where a junction box cannot be used because of too many connections | |||
=== | ===U-turns=== | ||
====U-turn instructions==== | |||
A U-turn instruction is given at box and partial box intersections automatically when the following conditions are met: | |||
# '''Three segments''': The U-turn is a reversal of driving direction through three segments: <br>an incoming segment (A), a single median segment (B) and an outgoing segment (C). | |||
# '''In/out parallelism''': The in and out segments (A and C) are [[Controlling_U-turn_penalties#Checking_for_parallel_incoming_and_outgoing_segments|within ±5° of parallel]] to each other, '''and''' | |||
#* The median segment (B) is 30 m (99 ft) or less, '''or''' | |||
#* The median segment (B) is 31 m (99 ft) but less than 50 m (165 ft) and the incoming segment (A) has [[Lanes|lane guidance]]. | |||
==== U-turn prevention in box and partial box intersections ==== | |||
{{:Editing Routing penalties/Controlling U-turn penalties/Disabled}} | |||
You may encounter intersections that appear pinched with a median segment that is shorter than reality. This was likely mapped prior to December 2021 to prevent u-turns. The intersection should be updated to match reality and a junction box used to prevent u-turns if necessary. | |||
{{clear}} | {{clear}} | ||
{{ReturnTo | Junction_Style_Guide | the Junction Style Guide}} | {{ReturnTo | Junction_Style_Guide | the Junction Style Guide}} | ||
[[Category:Style guides]] | [[Category:Style guides]] | ||
Revision as of 17:03, 22 November 2022
Three-way
Right angles

The simplest junctions often resemble a "T" and are considered diverging or branch roads. The branch road will normally meet the main road at nearly a 90 degree angle. This is the simplest situation to map, as the physical and logical views of the roads match up well.
Skewed angles
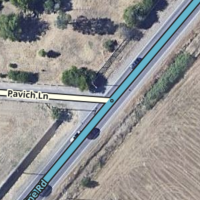
Some roads meet at skewed angles. These intersections should be mapped to reality. Mapping these to reality can result in turn instructions that would not match what the driver expects. Thus, at these intersections it is important to check the geometry, road types, and names to understand what instructions are given. If the default instruction is not desirable then a voice prompt override should be used.
- Depending on the angle, the client may give a "keep right or keep left" instruction to the driver when a "turn right or turn left" instruction is more appropriate. If Minor Highways or above are involved, you will actually get an "Exit Right" which can be confusing in many situations.
- In some cases, no instruction will be given at all.
The controlling turn instructions article has more information on the specifics of geometry, road types and names and how they affect turn instructions.
Doglegs

|
|
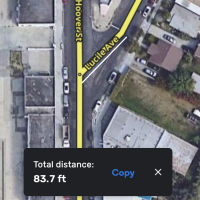
Doglegs can be added to better represent reality or aid in turn instruction timing where the large area of pavement should consider turns from all directions. When doglegs are added the first geometry handle should be placed a minimum of 12m (40ft) from the intersection node when measured with the ruler.
A deprecated method to control instructions at these intersections involved adding micro-doglegs (geometry handles placed very close to the node) to create geometry that would give the desired turn instruction. These intersections should be updated, micro-doglegs should be removed, and voice prompt overrides should be added if necessary.
Steep angles with exits and keep right or left
The straight ahead path should be more or less straight, with a smooth transition.
The diverging path should be configured as follows:
- First, place the first geometry handle of the diverging segment at the gore point (or "theoretical gore", i.e., where the painted lines diverge).
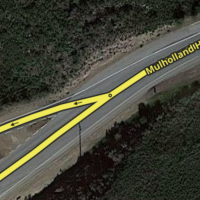
- Next, grab the node itself, where the segments meet, and adjust the geometry of the diverging path as follows:
- If the actual path diverges from the inbound path by less than 20°, adjust the node to create a 20° departure angle. This will allow for consistent timing of instructions and make it easier to report closures in the Waze client.
- If the actual path of the road diverges immediately from the inbound path by more than 20°, adjust the node such that the road path follows its true natural departure angle.
- Next, ensure that the last geometry handle before the node is at least 40 feet ahead of the node, and that the second geometry handle on the diverging path is at least 40 feet beyond the first geometry handle.
- Finally, check the turn instructions for both paths according to controlling turn instructions and if necessary add voice prompt overrides for the desired instruction.
Name changes on continuing path

For conditions where the through route changes road names, it is important to identify which segment is drawn as the continuing route and which is shown as the deviation from the main road. As the How Waze Determines turn/keep/exit maneuvers page explains, segment names and geometry are very important in determining what navigation instructions are given. Map these intersections according to the principles in this article and use voice prompt overrides as necessary for the proper turn instructions.
Four-way
Right angles

The second simplest junction category is a "+" or "cross" four-way junction that intersects at 90 degrees. These roads are simple to map as the logical and physical views of the roads match up well.
Skewed angles

Similar to diverging roads that intersect at skewed angles, crossing roads can do the same thing. These intersections should be mapped to reality. Mapping these to reality can result in turn instructions that would not match what the driver expects. Thus, at these intersections it is important to check the geometry, road types, and names to understand what instructions are given. If the default instruction is not desirable then a voice prompt override should be used.
- Depending on the angle, the client may give a "keep right or keep left" instruction to the driver when a "turn right or turn left" instruction is more appropriate. If Minor Highways or above are involved, you will actually get an "Exit Right" which can be confusing in many situations.
- In some cases, no instruction will be given at all.
The controlling turn instructions article has more information on the specifics of geometry, road types and names and how they affect turn instructions.
A deprecated method to control instructions at these intersections involved adding micro-doglegs (geometry handles placed very close to the node) to create geometry that would give the desired turn instruction. These intersections should be updated, micro-doglegs should be removed, and voice prompt overrides should be added if necessary.
Divided road intersections
Many of the principles stated above apply to intersections between divided roads. Usually, divided road intersections should look like the traffic lanes they represent. "Box" shaped intersections are easiest to draw, maintain, and to explain to other editors. Only use variations when they are needed or called for by regional / state guidance.
Box and partial box intersections
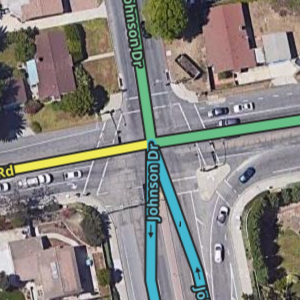
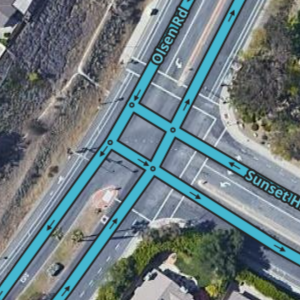
Box and partial box intersections are also referred to as # and H intersections in the Waze editor community. These intersections should be mapped as close to reality as possible. The below style guide addresses some unique circumstances.
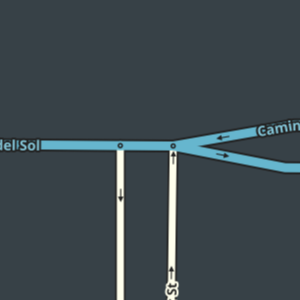
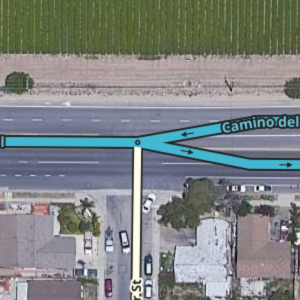
When creating three way and four way intersections, if the cross street changes names at the junction, make sure that the median segment(s) have no name. This will cause the segment to inherit the appropriate name depending on the direction of travel. The median segment will not be included when you choose "Select entire street". Conversely, leave the median segment(s) named if the street maintains name continuity through the intersection.
Bow tie
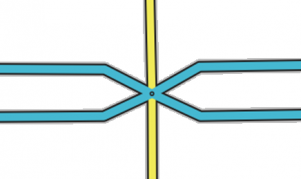
The bow tie intersection is no longer the best way to take control of turns and traffic at divided-road intersections. It is an unrealistic representation of an intersection and drivers report map errors based on this appearance. It was necessary for controlling turns and accurately reflecting traffic queuing before the introduction of the junction box, but now there are better methods to control turns and properly account for queuing.
- Where Waze seems to be doing a poor job of keeping track of traffic queuing, a junction box is recommended.
- To prevent U-turns at intersections use a junction box.
- Do not add new bow ties to the map.
- When you find a bow tie intersection on the map, check if it can be replaced by a realistically drawn intersection using other techniques to control turns and traffic.
- If you think it is necessary to add a bow tie to the map, contact state managers to discuss the intersection. They will most likely recommend a better approach.
- A bowtie intersection may be necessary at 5-point or greater intersections where a junction box cannot be used because of too many connections
U-turns
U-turn instructions
A U-turn instruction is given at box and partial box intersections automatically when the following conditions are met:
- Three segments: The U-turn is a reversal of driving direction through three segments:
an incoming segment (A), a single median segment (B) and an outgoing segment (C). - In/out parallelism: The in and out segments (A and C) are within ±5° of parallel to each other, and
- The median segment (B) is 30 m (99 ft) or less, or
- The median segment (B) is 31 m (99 ft) but less than 50 m (165 ft) and the incoming segment (A) has lane guidance.
U-turn prevention in box and partial box intersections
| As of December 2021[update], the Waze routing algorithm penalizing some double-left and double-right turns has been disabled in the United States. The routing server will no longer automatically avoid double-left turns. To prevent u-turns on divided roads, use a Junction box. |
You may encounter intersections that appear pinched with a median segment that is shorter than reality. This was likely mapped prior to December 2021 to prevent u-turns. The intersection should be updated to match reality and a junction box used to prevent u-turns if necessary.


