[Script] WME Image Overlays (1.5.4)

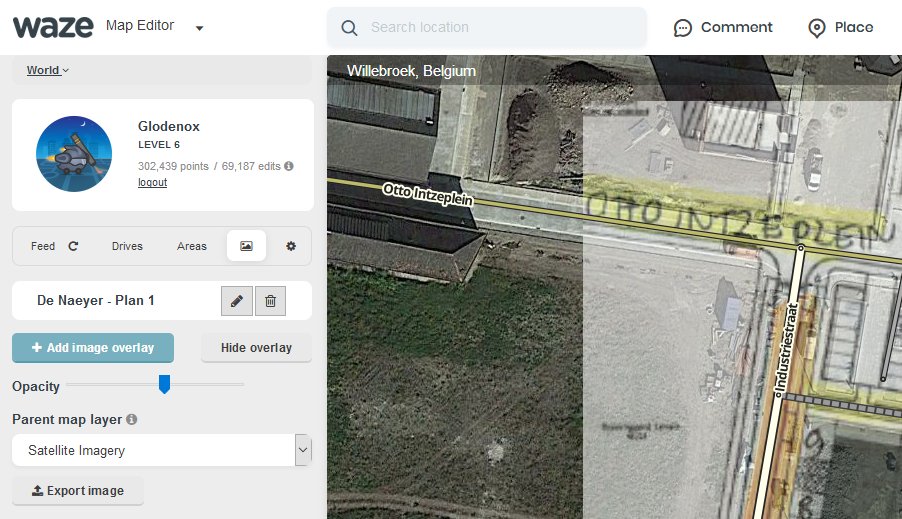
This userscript allows you to add local images onto the map as background help while editing. This makes it possible to accurately draw roads that aren’t available yet on satellite imagery with just a picture or screenshot.

How to use
The script adds a new tab where you can add new images to the map and find the current list of images already on the map. When adding a new image, you can choose a local file or paste an image from your clipboard. Once you’ve properly aligned the image and pinned it to the map, it will be stored locally on your computer for future use.

It is possible to export an image and all its properties (location on map, rotation, size, …) with the “Export image” button when you have an image selected. You can import an image with the “Import image” button that is available if there is currently no image being displayed.

Installation instructions
In short: get it from GreasyFork.

Userscripts are snippets of code that are executed after the loading of certain webpages. This script does this after the loading of the Waze Map Editor. In order to run userscripts in your browser, you are adviced to use Firefox or Google Chrome.

You will need to install an add-on that manages userscripts for this to work. There’s TamperMonkey for Firefox and Chrome.

These add-ons will be visible in the browser with an additional button that is visible to the right of the address bar. Through this button it will be possible to maintain any userscripts you install.
For WME Image Overlays, you should be able to install the script at Greasy Fork. There will be a big green install button which you will have to press to install the script.

After installing a userscript, you will be able to find it working on the site(s) specified. Do note that if you had the page open before installing the userscript, you will first need to refresh the page.

TamperMonkey will occasionally check for new versions of these scripts. You will get a notification when a new version has been found and installed.

Feedback and suggestions
Any issues found can be reported at the GitHub project page or in this forum thread.

6 Likes

Looking forward to using this. Thank you!

Sent from my iPhone using Tapatalk

Very cool. Thanks!

Can stop using tracing paper now!
Brilliant Script allowing for zoom, rotation AND transparency; you seem to have thought of everything.

I’d still like to improve the controls to add the image, but adding those without fighting with the existing WME controls is a bit difficult. For now those buttons should suffice though :slight_smile:

There have been many times I could have used this in the past, thank you for this!

Had my first occasion to use it this morning. THANK YOU! I was able to add a whole new subdivision of HNs in about 1/10th the time.

Excellent script! I look forward to making use of it.

Would it be possible to add some buttons for finer adjustments to the image size when aligning it? I know it may damage image quality, but the the image I just tested with couldn’t quite be size-adjusted to match WME.

AN opacity slider or control during alignment might be useful too. :mrgreen:

I haven’t had the opportunity to use this script yet but look forward to it when I do. I do agree, fine tune adjustments and opacity would be a great addition.

1 Like

The buttons already allow for finer adjustments the more you are zoomed in :slight_smile: They basically scale with the zoom level of the map. Only the rotation buttons keep working in multiples of 0.5 degrees at all times. I’ve tried several small and big images and that always worked well enough. It’s not always possible to have a 100% match, but it should be good enough to draw roads or add places.

An opacity slider already becomes available in the image overlays tab after you’ve selected an image to align. Perhaps you moved to another tab and didn’t notice it that way? I decided to leave the opacity slider and parent map selector there as they were already present there for later adjustments.

It’s great, tk

Enviado desde mi HUAWEI Y600-U351 mediante Tapatalk

Right on both counts (you I mean, not me!). :mrgreen:

I’ve already had an opportunity to use it twice “in anger” and it was very helpful. I discovered, as you say, that the size adjustment scales with the map zoom, so that works perfectly. I assumed the opacity slider was only operative for attached images but, now you’ve told me, I can also see that works perfectly.

I can’t think of any way to improve it. Thank you very much. :smiley:

Great help. This works very well in both (Beta and Prod).

Sounds good - I’ll have to give it a try and see how much time it saves compared with my usual workflow of screengrabbing the section of WME I’m about to edit, pasting this and the site plan image into GIMP, scaling/rotating/aligning the latter to fit the former, then aligning the GIMP window with the browser window and finally alt-TABbing between the two like an old-school animator flicking between two frames to check one against the other as I start adding in the new roads…

…I suspect the answer will be “quite a lot”!

The only thing the script currently doesn’t allow is stretching images in a horizontal or vertical way only. But I’m not certain whether I should try to add that as such images generally can’t be relied on to accurately draw roads on the map.

In that case, if I get some time over the next few days, I’ll try replicating the above workflow in some of the recent areas I’ve used it, to see if the script can do everything I’d need of it, as not being able to alter the aspect ratio of the overlaid image could be a dealbreaker for me.

It’s frequently the case that the site plans I work from aren’t always provided in the correct ratio for use in WME. Whether this is because they’ve been derived from a map which used a different projection method to WME, or whether it’s because the version made publically available has gone through so many conversion and formatting steps that the ratio has been altered deliberately/coincidentally, I wouldn’t like to say, but it does happen.

Amazing! Thanks Glodenox

First real-world test was largely most promising, although I’d echo Iain’s request for finer control over the scaling control. Even zooming in further, the scaling steps were a bit too large, so I think halving the step size for each zoom level would be beneficial, or maybe provide a “fine/coarse” toggle control so we can switch between step sizes?

Also, when running WME in UK English, the script localisations are broken - line 172 needs a minor tweak to fix this:

om_strings['en-GB'] = om_strings['en-US'] = om_strings.en;

Once an image has been attached, would it be possible to allow further editing of it (beyond its name)? Could be useful if we’ve started the process of getting an image lined up but don’t have time to finish the fine-tuning in that edit session and need to come back to finish off later…

I couldn’t remember which recent site it was where the plan aspect ratio was screwed up, so I’ll keep the request for aspect ratio adjustment in my back pocket for now, but I’m certain it will come up again sooner or later, so just be prepared for it :wink:

Has the English (GB) identifier changed again then? :frowning: At least it’s consistent now. I’ll get it fixed later today.

I could provide a sensitivity slider below the controls, though I’ve always seen those controls as a temporary solution anyway. My current train of thought is to add handles to the image that allow you to resize/rotate/transform it, but make the buttons show up in a corner of the map whenever you’ve zoomed in on the image so much that you can’t use those handles any more to adjust the image. I know that it’s possible to implement this and mostly know how to do it. I just need to check how practical it would be to use.

I had thought about adjusting the image after it has been attached, but I couldn’t find any often occurring use case that warrants the changes in the work flow that would be needed. Allowing adjustments later on would also make it slightly harder for me to implement an alternative way of aligning the image to the map, but I’d rather not talk about that yet before I’ve actually tried it out.

This is an awesome script. Was able to use it to set up a new subdivision easily. Thank you for doing this!

Cheers!