Create & Edit Traffic Events
As a community map editor, mapping events gives drivers a crucial heads-up so they can seamlessly navigate around disruptions. Your quick updates build trust and keep the map reliable for everyone in your community.
When you map an event, Wazers get alerts about traffic changes, helping drivers stay updated and plan routes around affected areas.
The process
Before jumping into the WME, here is how traffic events go from planning to live map alerts:
-
Gather local facts: Identify the event type, start and end dates, official name, and relevant links.
-
Map it in WME: Draw the impacted area, add any known closures, and fill in the required attributes.
-
Waze handles the rest: Once published, affected drivers automatically get notifications based on the event’s area and schedule.
Choose your event mapping approach
Depending on the information you have, use 1 of 3 ways to map traffic events:
-
Combined closure & polygon-based events (Recommended): If you have information about both known road closures and the overall affected area, map both. This combination provides better event coverage and ensures all affected drivers get notifications.
-
Closure-based events: For events with known road closures in advance, you can map the closures and associate them with the event. Drivers who frequently use these roads in the last 40 days or have saved places nearby get notifications.
-
Polygon-based events: When you’re unsure about exact road closures but know traffic will be affected, create an event and draw a polygon around the expected impacted area.
*note that max polygon size is 20x20 km
Understand traffic event categories
Waze categorizes traffic events to deliver accurate routing and contextual alerts. Select the category that best matches your scenario:
-
Concert: Live musical or cultural performances across single or multiple venues.
-
Construction: Roadway infrastructure projects, utility repairs, and resurfacing that require lane closures or detours.
-
Crisis: Sudden, critical emergencies such as floods, wildfires, or severe weather incidents.
-
Demonstration: Public marches, rallies, or blockades that alter traffic flow.
-
Local driving advisory: Planned, permanent or long-term (more than 1 year) regulatory or traffic rule updates that require driver action.
-
Festival: Hyperlocal neighborhood gatherings, public or national holidays, and religious or cultural festivals.
-
Other: Non-celebratory events such as filming locations, VIP visits, or memorial services.
-
Parade: Processions of people, floats, or vehicles moving along a set route.
-
Sports event: Organized competitions such as marathons, tournaments, and races.
-
Summit: Large-scale conferences or official gatherings.
-
Unplanned disruptions: Unexpected live incidents that cause major delays.
How “Local driving advisory” category works
Unlike standard traffic events, a Local driving advisory category is saved for planned, permanent or long-term (more than 1 year) regulatory or traffic rule updates that require driver action. this is why the end date is diabled.
-
Use a polygon shape: Create a polygon-based traffic event under this category in WME.
-
Provide clear details: Include the start date and a clear, actionable description.
-
No end date: You cannot set an end date, as this category is strictly reserved for permanent or long-term changes.
Please note the push for this event requires an additional approval by Waze Partner Manager
Learn how push notifications work
Waze schedules push notifications to trigger before or at the start of an event, while observing quiet hours to avoid driver disruption:
Push notification timing
Waze schedules push notifications to trigger based on the event’s “Start of traffic” time as it is set in the WME, while observing quiet hours to avoid driver disruption.
Notifications are scheduled up to 3 hours prior to the start time, respecting defined quiet hours:
-
Standard events: Quiet hours run from 22:00 to 07:00
-
Driving advisories: Quiet hours run from 22:00 to 10:00
If a notification falls within quiet hours, Waze sends the push alert during the preceding evening instead.
If the event was published after it’s start time, the push will be sent out ASAP.
Notification audience
Waze targets push notifications to drivers who drove on the affected segments within the past 40 days.
Closure-based events: Waze notify drivers who drove on these specific closed roads in the last 40 days, as well as any drivers who have saves their Home or Work locations in the area.
Polygon-only events: Waze notify drivers who drove on the segments inside your drawn polygon in the last 40 days, along with drivers whose saved Home or Work location falls inside the polygon
Please note that Waze publishes construction events that include road closures on highways or bridges.
If you would like to publish a construction event that does not involve highways or bridges, please email waze-closures@google.com with the event link and ask the team to publish it
**
Create a traffic event**
Step 1: Set up the event
-
Log in to the Waze Map Editor
-
In the search bar, enter the location of the event
-
Click Events, in the left-side panel
-
Click Create event
-
Under the “Event category” section, choose a category that best describes the event
-
Enter the “Start of traffic” and “End of traffic” dates and times for the event
-
Under the “Event name” section, enter a name for your event in English.
Note: there’s a 25 char limit for the name due to push notification space limit -
In the “Event description” section, enter a short description that describes the event
-
[Optional] Under the “Translations” section, select the relevant language and enter the event name in the local language
-
In the “Event website” section, enter the official event website
-
Under the “Lock” section, select a lock level to restrict lower-level editors from editing the event
-
Click Save, in the top-right corner
Step 2: Define the impacted area
Choose 1 of 3 options depending on your event type:
-
Option A: City (for closure-only events)
-
Under the “Impacted area” section, select City
-
Click No address
-
Select the relevant city and state
-
Click Apply
-
-
Option B: Draw a polygon (for polygon or polygon and closures events)
-
Under the “Impacted area” section, select Specific area
-
Click Draw on map
-
Click around the affected area on the ma
-
Double-click to complete the shape
-
-
Option C: Insert coordinates (for polygon or combined events)
-
Under the “Impacted area” section, select Specific area
-
Click Insert area coordinates
-
Paste the GeoJSON, KML, or WKT polygon string, then click Create polygon
-
Step 3: Add road closures (if available)
Learn how to add and manage closures.
Step 4: Submit the event
-
Click Events, in the left-side panel
-
Click your event to view the details
-
Verify event details are correct
-
Click the Road Closures tab
-
If available, verify the road closures details are correct
-
Click the General tab
-
Click Submit. A popup window will appear.
-
Click OK
-
Click Save, in the top-right corner
Edit an existing event
You can edit fields for existing traffic events as outlined in this article. Remember that each event must have either closures or polygons associated with it when editing.
Got questions?
Why does my polygon event show an error during creation?
Polygon shapes exceeding 20 kilometers trigger system limits. Switch the “Impacted area” setting to “City” for broad-area events like marathons and editing the polygon size to be smaller than 20km
How do drivers see events in the Waze app?
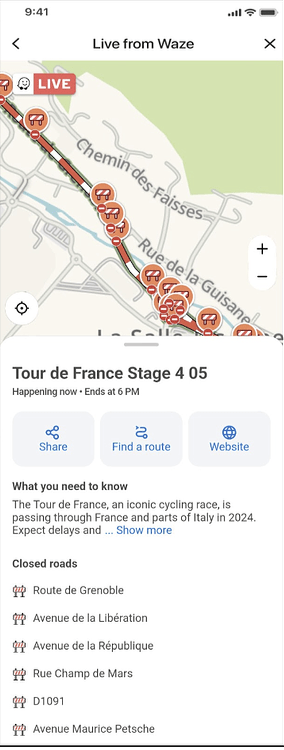
Every time you submit an event, Waze automatically generates a dedicated landing page for it (see the example below). When drivers tap on a push notification, they are taken straight to this page.
Here, they will see all the helpful details you added in WME—including the event name, description, timing, and a clear map showing the closures and polygon (if added).