We’re introducing Traffic Lights to the Waze map. This feature is designed to enhance driver guidance, especially in dense areas with complex intersections and multiple turns. By referencing a traffic light in the driving instructions - for example, "turn left at the traffic light” - we can provide clearer, more confident directions. This will help Wazers better orient themselves on the map, identify the exact turn they need to take, and contribute to an easier and safer drive.
Lock Level - Traffic Lights
-
Default lock level: 4
-
Can be configured per country. Lock level applies to creation and editing of Traffic Lights
-
Champs and Coordinators can reach out to their Staff Community Manager to modify the lock level.
Mapping Guidelines - How to add a Traffic Light
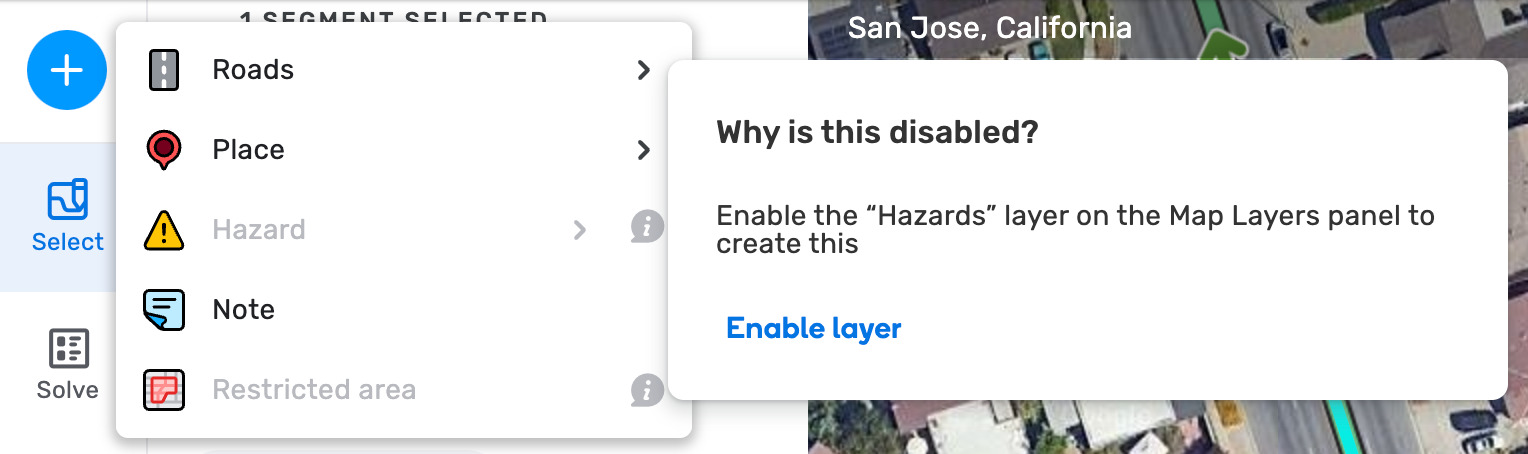
- Click on the Hazards button on the top right side of the screen and click “Enable layer”
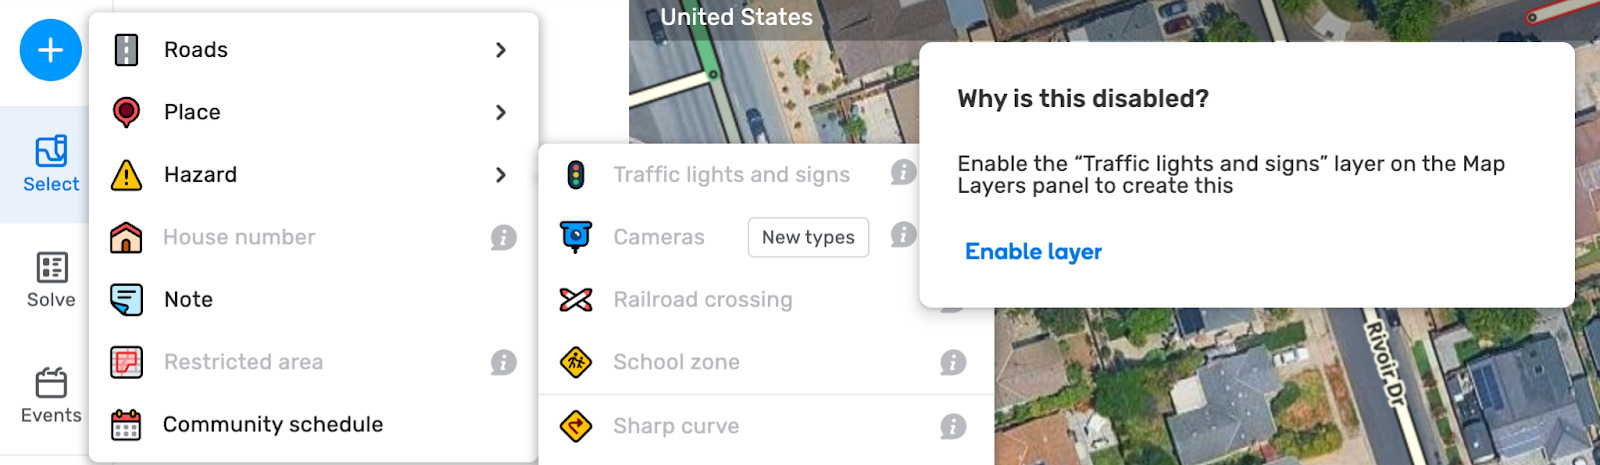
- Now that the layer is enabled, select ״Traffic lights and signs” and enable this layer as well.
-
Hover your mouse over ״Traffic light” and click it to start adding this map entities to relevant segments.
-
Drag the icon to the end of a segment where you want to place it; the relevant segment end will highlight. This is different from other permanent hazards, as these are snapped to a segment’s endpoint.
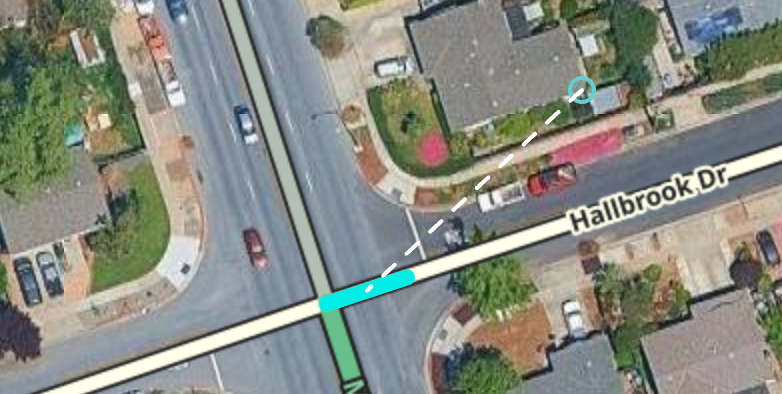
- Dropping the icon will create the traffic light.
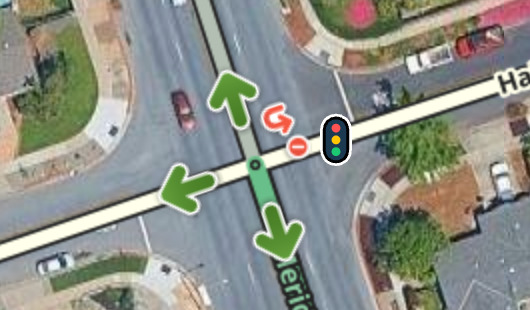
- You may also drop the icon on the node, in this case it will create traffic lights for all segments that end in that node for a faster deployment. This will be same of H and # junctions where you might need to manually remove the traffic light from the median segment, if you chose this method of adding lights to the map.
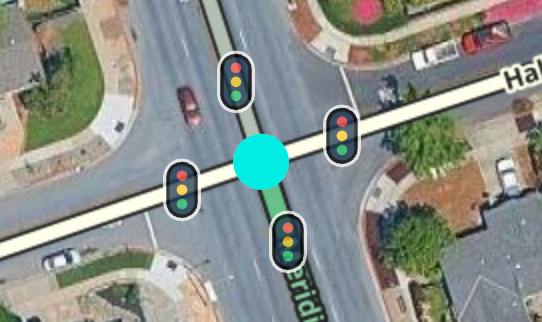
- Traffic lights have a keyboard shortcut: shift+T
Traffic Light Coverage
When mapping, the map is at its best when it reflects the ground truth. Comprehensive coverage for traffic lights is important for providing drivers with a consistent experience and a clear indication of exactly where they need to turn. This is specifically crucial at junctions with several consecutive traffic lights; in these scenarios, being able to distinguish the specific light where a turn is required is vital for clear guidance and preventing driver confusion.
Placement: Traffic lights should be placed at the legal stop line, where a vehicle is required to stop before the traffic light. Please avoid adding traffic lights to internal median segments.
Mapping Guidelines - Controlling Turns
A key aspect of this feature is the ability to control which specific turns a traffic light affects.
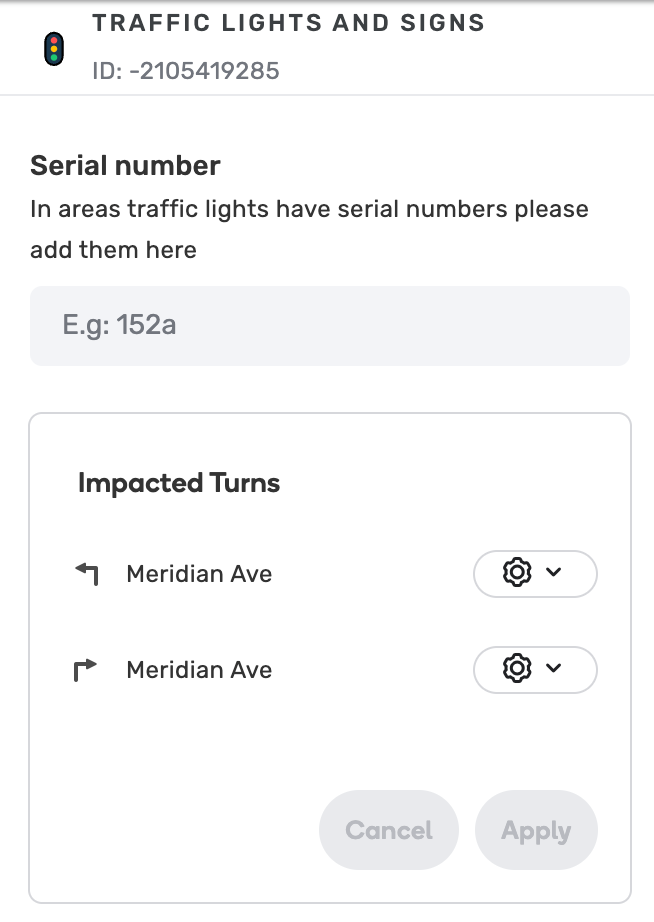
- After placing a traffic light, the left panel will display a list of all turns originating from that segment’s endpoint.
-
In areas traffic lights have serial numbers you can add these to the designated field. Please note that this will not show up on the app at this stage.
-
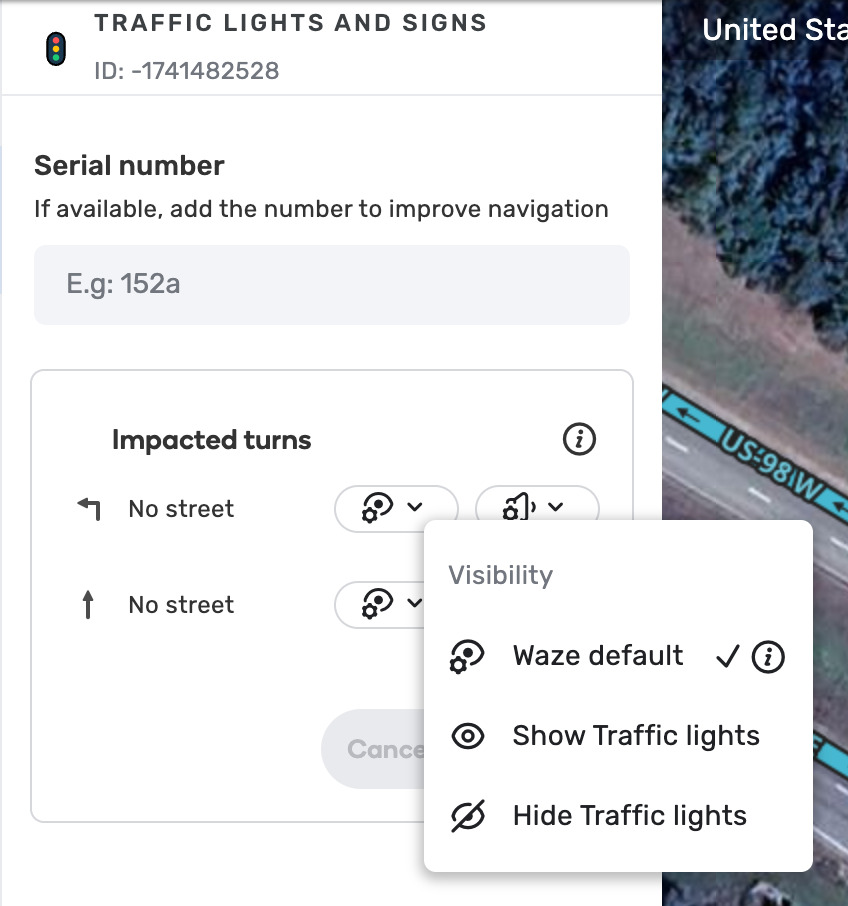
Visibility - Next to each turn, a dropdown menu allows you to have control over the visibility of the traffic light:
-
Waze default: Waze will decide if we should show the traffic light or not, if the traffic light is on our route we will always show it, in roaming mode we are a bit more selective to avoid spamming the drivers.
-
Show Traffic lights: Always show this traffic light (ignore any heuristics, see “Previous Ramp” down to understand more)
-
Hide Traffic lights: Do not show or use this traffic light for any instruction, this is useful, for example in junctions that have AGC in reality but don’t have it mapped for any reason, while in some cases it would still be good to see a TL and hear “turn right at the traffic light” even when going through an AGC, in some cases it might be a bit far and you could control and then even though the junction is mapped without an AGC we will still not show the Traffic light and not use it in the instruction.
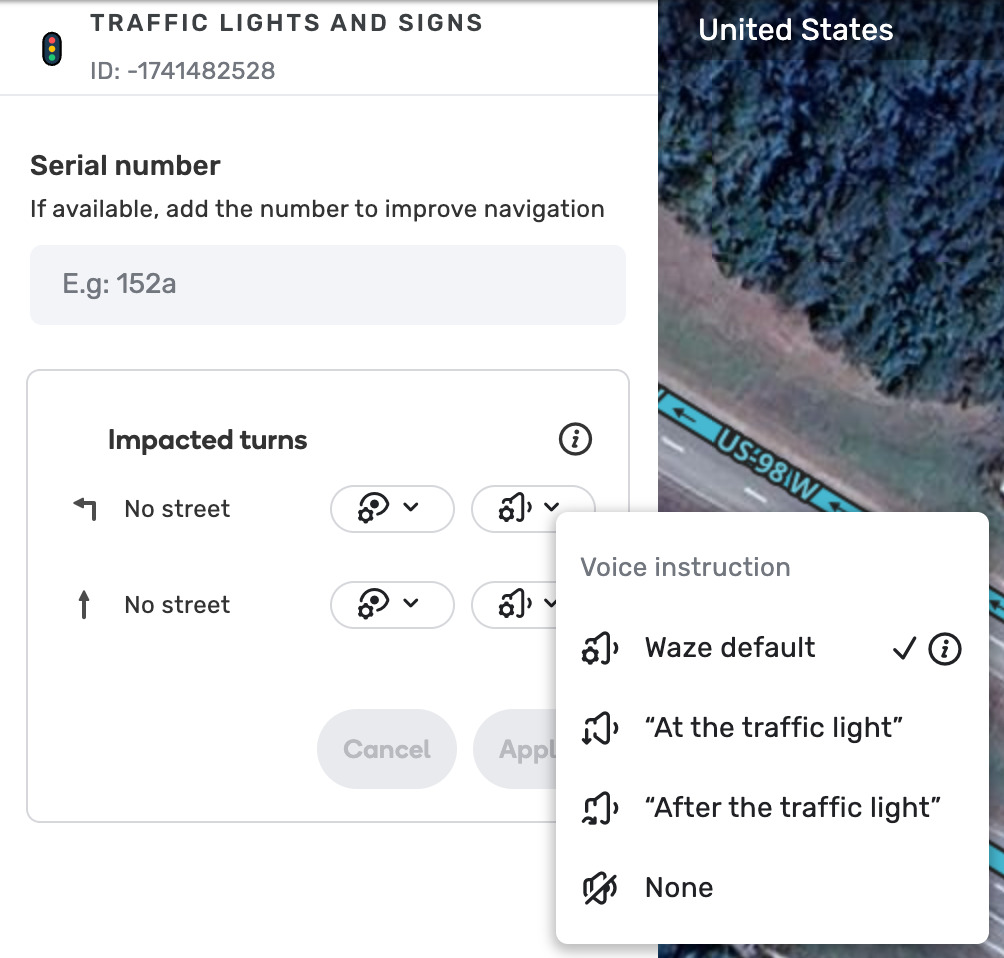
- Guidance - A dropdown menu will allow you to have control over the voice instructions (guidance):
-
Waze default: Waze will decide which instruction to give for the Traffic Light
-
Use “At” the traffic light: Decorate voice instructions with “At the Traffic Light”.
-
Use “After” the traffic light: Decorate voice instructions with “After the Traffic Light”. Useful for turns that are very close to the traffic light but just after it.
-
None: No Traffic light Instructions (Traffic Light icon would still be visible in the app)
Traffic Lights and Voice Override
The voice override option for traffic lights acts as a priority hint. Since we aim to keep instructions relevant and concise, it will not always be announced - for example, when mentioning lanes, which take precedence to support the maneuver.
Lane Guidance Priority: Lane instructions take precedence in early and mid-turn prompts. The traffic light decoration is most likely to trigger during the “last call” (the final instruction at the junction), where lane guidance is no longer mentioned. If no lanes are mapped, the traffic light decoration will trigger in earlier turn instructions as well.
"None" - Selecting this ensures the traffic light is never mentioned
"At"/“After” (Override) - This serves as a strong hint to the system that voicing the traffic light at this junction is important. Our system will take this preference into account and attempt to include the traffic light decoration in the instruction whenever the prompt length allows.
“Waze Default” - If a traffic light is visible, it may be mentioned in voice instructions:
“At the traffic light”: Used if the light is on the segment for which the instruction is generated.
“After the traffic light”: Used in cases where the light is located up to 100 meters before the turn.
Advanced Guidance Logic: “At” vs. “After” the Traffic Light 
Waze uses heuristics to decide if a series of turns should be called as one single maneuver (“At the traffic light”) or separate actions (“After the traffic light”). Based on community feedback, we have refined this logic to handle complex intersections more accurately.
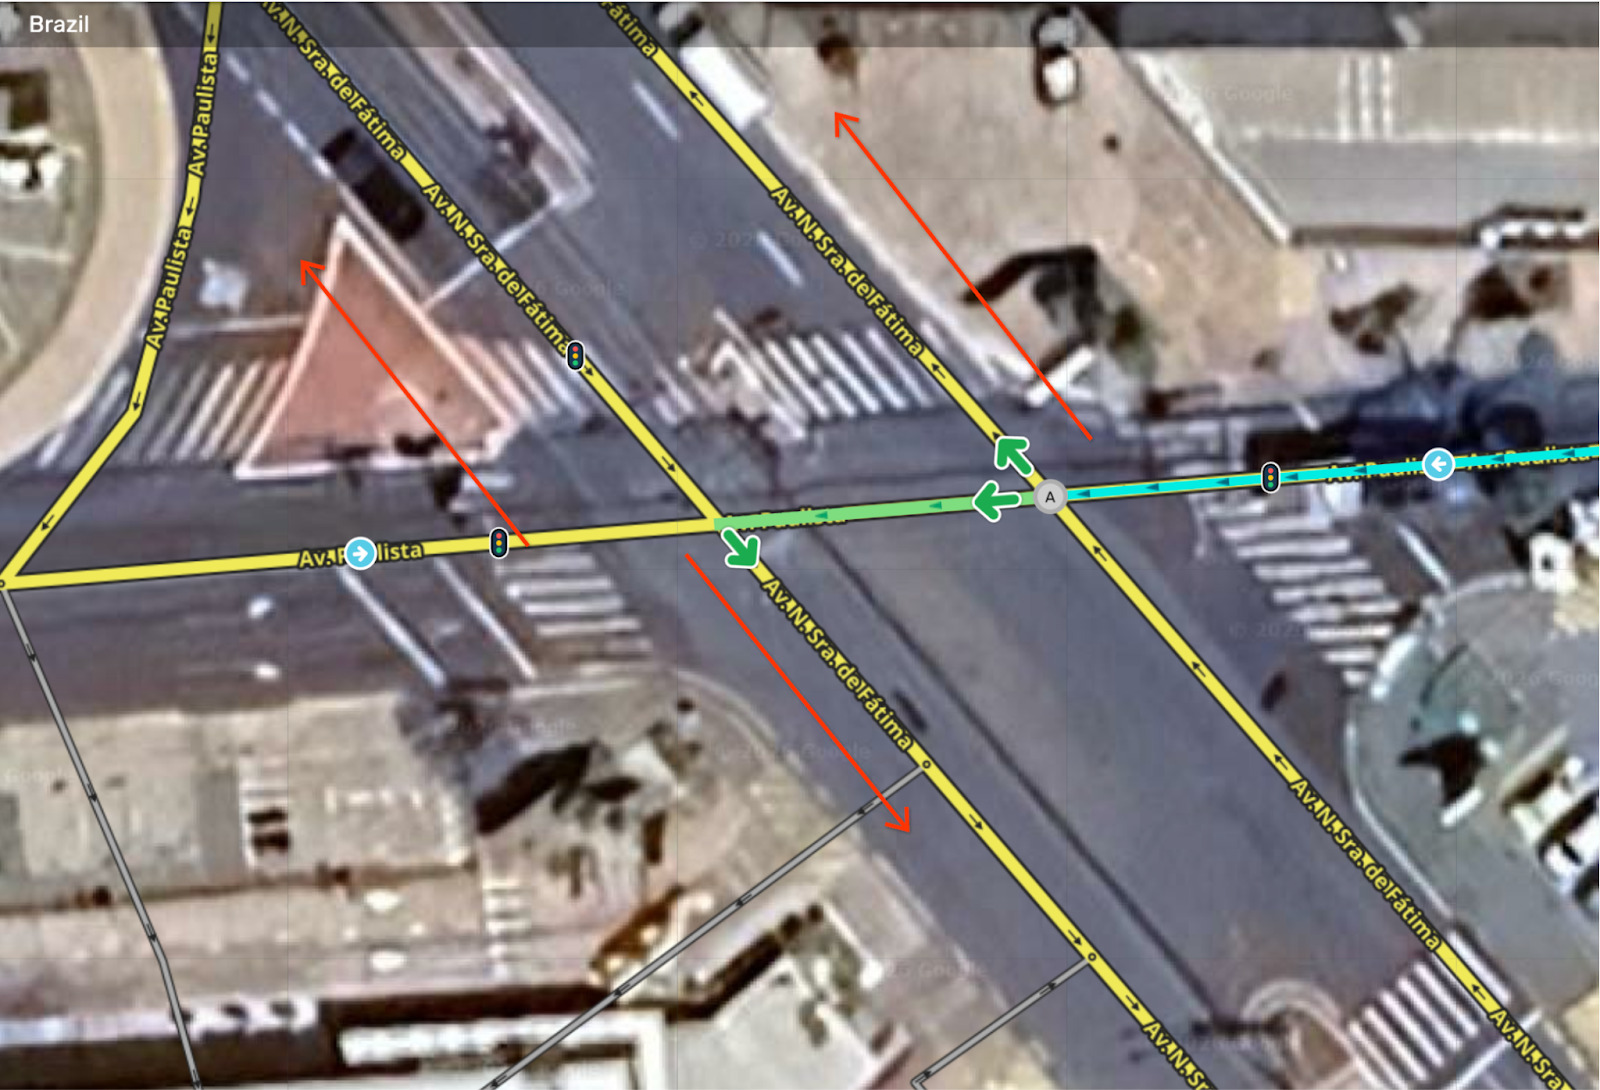
Case 1: Handling “Skewed” H\Hash-Junctions
Sometimes an intersection doesn’t sit at a perfect 90-degree angle, causing Waze to miss the H\Hash-junction detection and tell drivers to turn after the light instead of at it.
-
The Old Heuristic: Standard detection only allows up to a 21° deviation from a 90° turn.
-
The Update: If an editor provides a Path or Junction Box as a hint, the system now allows for much wider angles - up to 40°.
-
Editor Tip: If a maneuver feels like it should be “At the light” but isn’t triggering correctly, add a Path or JB to help the system.
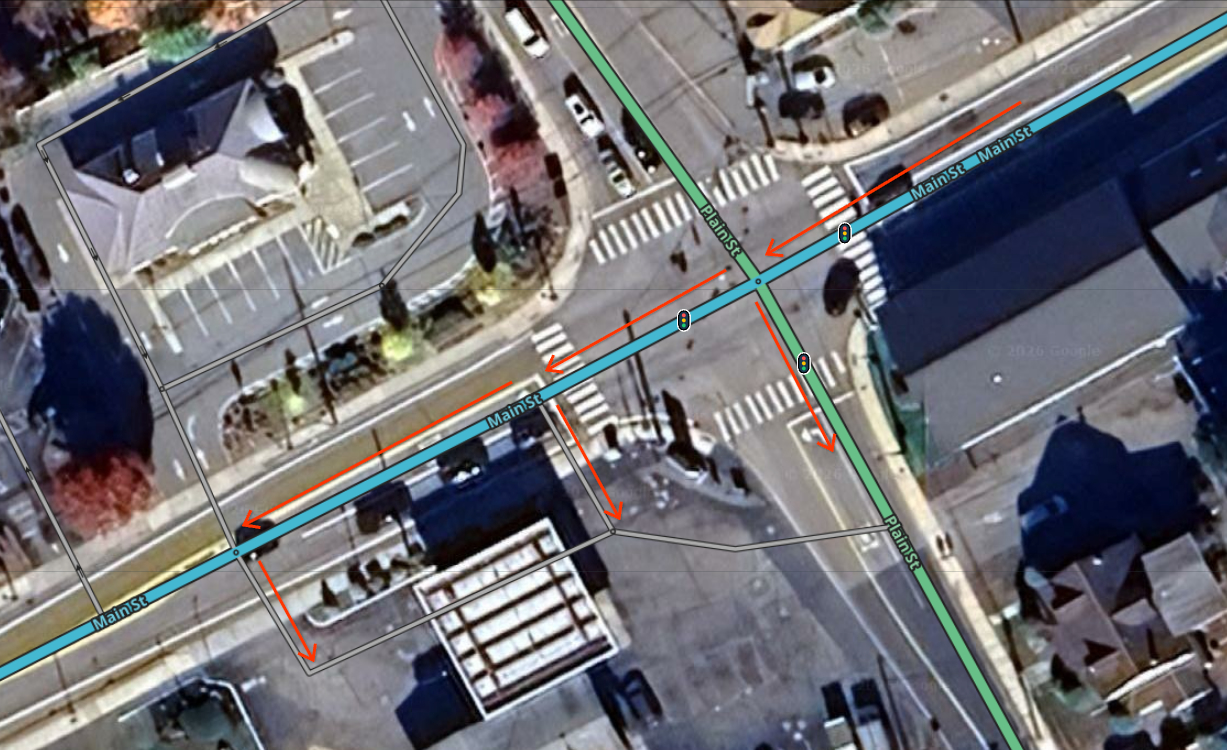
Case 2: Preventing “At the Light” Instructions for the consecutive left turn (H-junction)
In some scenarios, like a left turn at a signal followed immediately by another left into a parking lot or side street, the system might merge them into one maneuver.
-
The Update: If the system detects a first left turn followed immediately by a second left turn, it will no longer group them as a single H-junction. Important: this is a change for H-junction heuristic in general, and not just for traffic lights
-
Result: The second left turn will be excluded from being an H-junction. The driver will receive a clear “After the light” instruction for the second turn, preventing them from trying to turn too early.
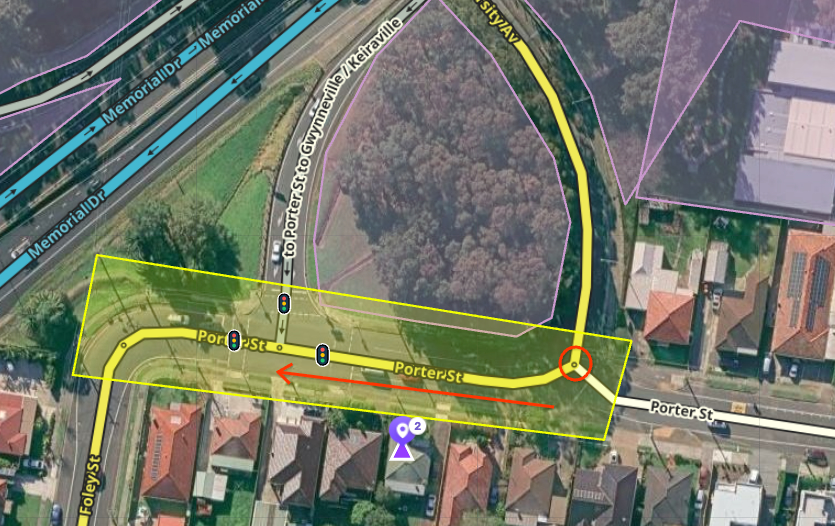
Case 3: Junction Box Limitations
A Junction Box alone does not always mean a maneuver is a single “at the traffic light” if the geometry doesn’t look like a standard H/Hash junction.
-
The Update: If the geometry is not an H/Hash shape and there is no explicit Turn Override, Waze will no longer assume it is a single maneuver just because a JB is present.
-
Result: Instructions will default to “After the light” to ensure timing is accurate to the driver’s actual position.
-
Editor Tip: If you want a complex junction to be a single maneuver, you must use an Instruction Override inside the Junction Box. Also, if you want to override just the TL behavior - use the “Voice Instruction” mode for that maneuver.
Quick Summary
| Scenario | Geometry Type | Editor Hint Present? | Instruction |
|---|---|---|---|
| Skewed Junction | H-junction (up to 40°) | Yes (Path/JB) | “At the traffic light” |
| Double Turn | Two Lefts in a row | Any | “After the traffic light” |
| Non-H Geometry / Complex Junction | - | JB (No Override) | “After the traffic light” |
| Non-H Geometry / Complex Junction | - | JB with Override | “At the light” |
- Identifying “Relevant Turns”
When you select a traffic light, the editor generates a list of “relevant turns,” which includes every turn a driver might take that is directly or indirectly affected by the light. A relevant turn can be:
-
Impacted Turns are any turns made directly from the very end of the segment where the traffic light is located.
-
Crossing Paths: Any path (either JB path or regular path) that crosses this traffic light to a turn further down the road, mostly useful to control left turns (or right turns if you are driving on the left) in # junctions) but can be used for any other paths crossing.
-
Previous Ramp: A “nearby turn” (like an AGC) that happens before the traffic light but is part of the same junction (e.g., a bypass lane). We have a default behaviour where very close AGCs will be included. You can override it here. The current heuristics (since you guys love knowing them!
 ) is that when the Traffic light is 50m to 30m away from the AGC - we show it on the map but don’t decorate the instruction, when the traffic light is 30m or less from the AGC we also add “at the traffic light”, this is configurable and we will fine tune it. Meanwhile you can override it of course.
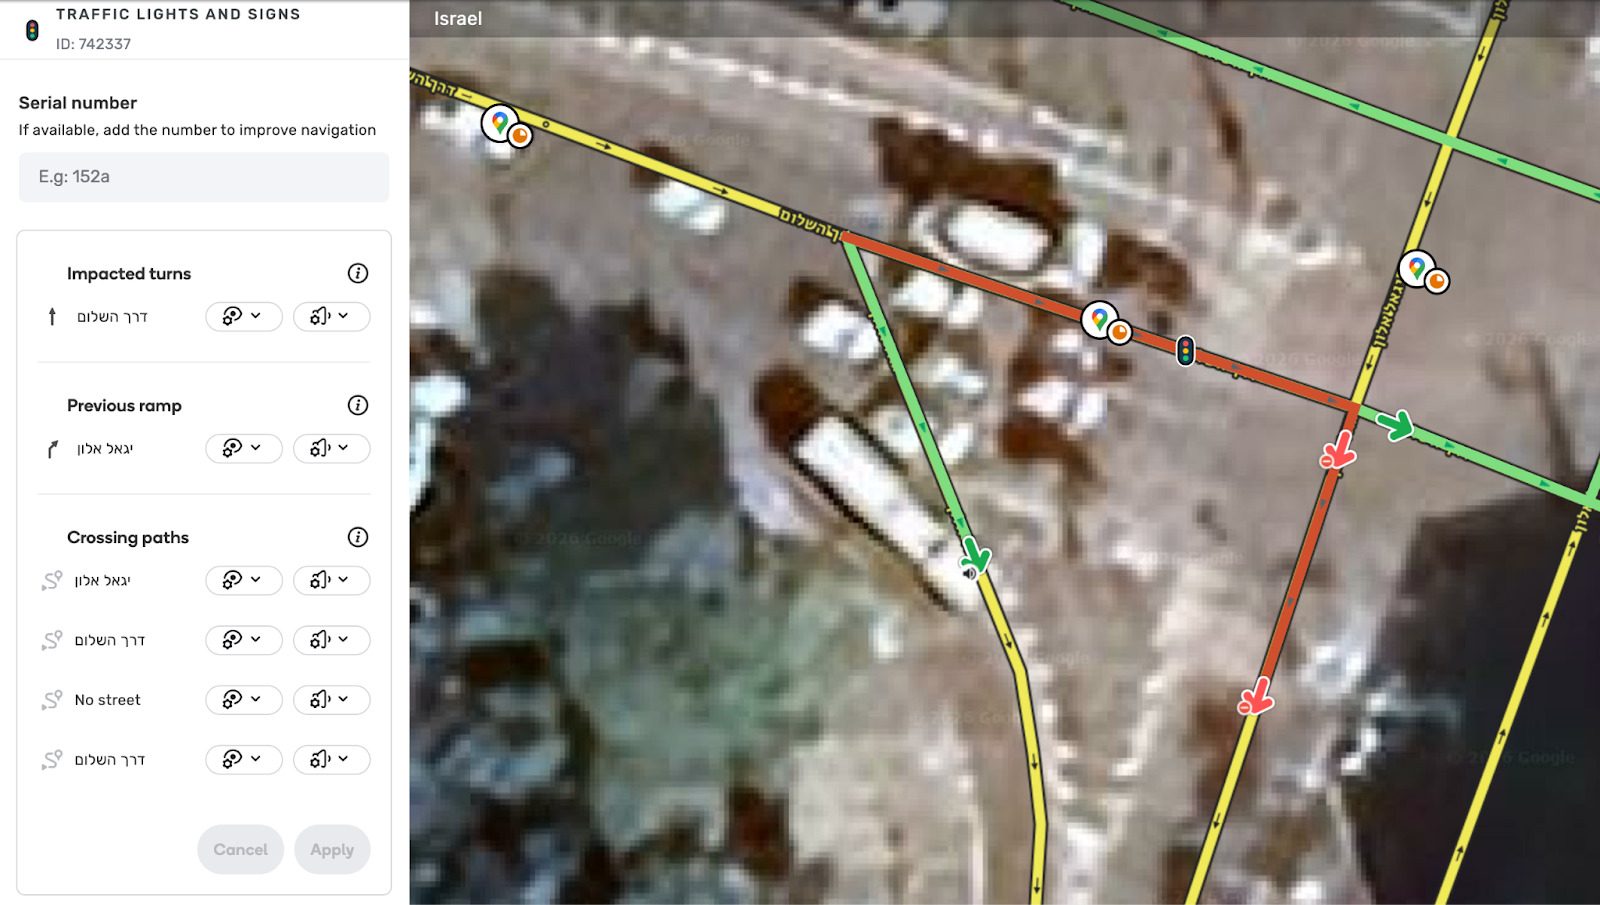
The left-hand panel is where you manage turns for the selected traffic light. Visual Cues:
-
Turn Arrows: Each item has a turn arrow to help you visualize the direction. These are generated automatically and cannot be edited, please note that in some complex weird junctions with paths coming from a gazillion miles away it might look weird (IE: straight arrows where you don’t expect them), in most junctions it should just work, please pay attention to the turning arrow to understand which turn it’s actually impacting.
-
Interactive Highlighting: Hover your mouse over any turn in the panel to highlight the corresponding turn arrow on the map.
Mapping At-Grade Connectors (AGCs)
- Accurately mapping At-Grade Connectors (AGCs) - also known as ramps or slip roads - is critical for ensuring drivers clearly understand directions at junctions with traffic lights. When an AGC is not rendered on the map, the presence of a nearby traffic light icon can create significant confusion. People can misinterpret the instructions, assuming they should turn at the visible traffic light rather than take the unmapped ramp.
Consequently, the explicit mapping of AGCs is essential to prevent driver misinterpretation and ensure navigational clarity in these common scenarios.
- Best Practices for Determining Whether an AGC Needs to Be Mapped
If your local community currently doesn’t map AGCs, we advise you to add them while mapping Traffic Lights.
A recommended rule of thumb is to map an AGC:
-
Generally speaking, we think that almost any visible AGC should be mapped.
However, we understand that it’s not always feasible and sometimes makes the junction overly complicated. So at the very least we would recommend doing it for any AGC that is longer than 30m from the center of the relevant segment (see drawing).Measure the distance from the turning node before the intersection (where the slip lane should be) to the turning node within the intersection. If this section is 30 meters (~98 feet) or more, the AGC should be mapped.
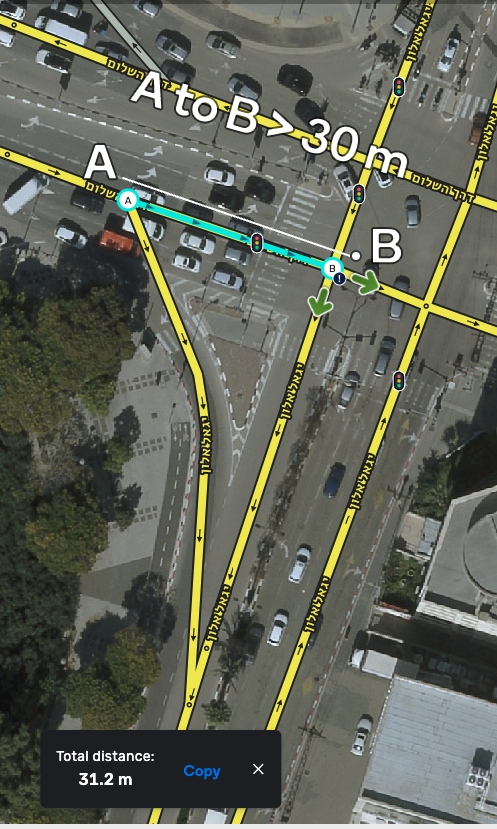
How We Identify Slip Lanes (AGCs)
We use two main methods to “detect” if a nearby slip lane should be associated with a traffic light. This is what determines if you’ll see that slip lane in the traffic light’s “Relevant Turns” list.
Method A: Path-Based Detection (Explicit)
This logic is used when there is already a Junction Box or a Path mapped that connects the approach road to the traffic light.
-
The Connection: A Path exists from Segment A (Entry) to Segment Bn (where the traffic light is).
-
The Slip Lane: A turn exists from Segment A that diverges away from that main path.
-
The Distance: The distance from where the slip lane starts to the traffic light must be 50 meters or less.
-
The Rule: The path must actually “go through” the traffic light segment, not just end there.
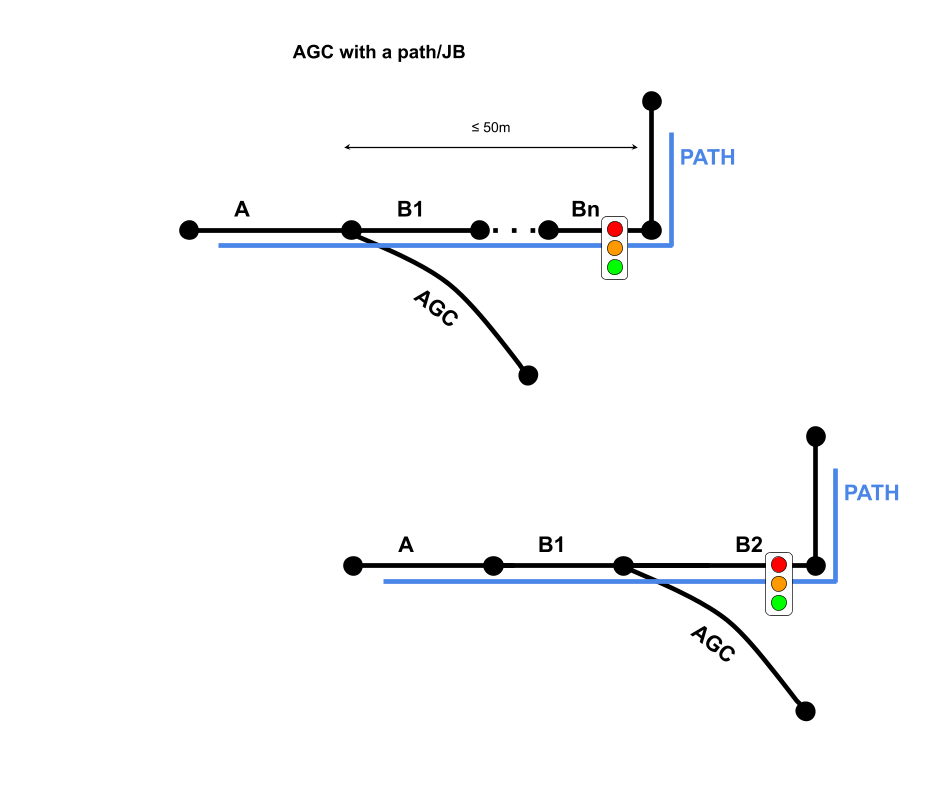
Method B: Automatic Discovery (Heuristic)
If there is no Junction Box or Path, we use “geometric math” to guess if a segment is a slip lane.
-
The “Straight” Test: The main road (Segments A and B) must be nearly a straight line.
-
The “Slip” Test: The candidate slip lane must diverge at a sharp angle (55° or less). This prevents standard 90-degree intersections from being misidentified as slip lanes.
-
The Distance: The segment leading to the light (Segment B) must be 50 meters or less.
-
Other Rules: All segments must be one-way, and the turn cannot be a U-turn.
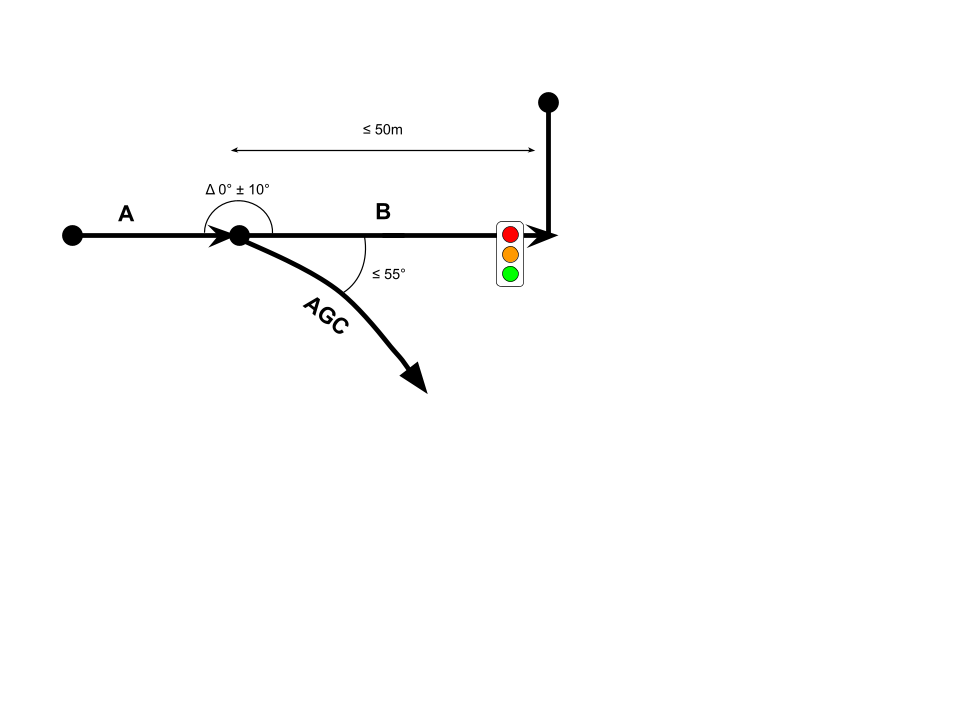
Edge cases:
-
Direct TLs Win: If a slip lane has its own traffic light mapped to it from segment A, Waze ignores the “detection” logic and uses the direct light instead. Please note that a TL on the end point of the AGC itself will still be shown, so if you don’t want the “auto detected” AGC to impact the TL on segment B/Bn - you can just hide it.
-
No Duplicates: If a segment is caught by both Method A and Method B, Waze is smart enough to deduplicate them so you only see it once in your turn list.
Editing Restrictions for Segments with Traffic Lights
In production, editors may encounter errors when making certain edits. This is an intended part of the feature designed to protect the map. An error might still occur if editors try to edit some aspect of the segment if it is impacting the Traffic Light and they don’t have the required level to edit the Traffic Light itself.
These actions will fail in production on segments that have Traffic Lights:
-
Direction change of a segment to a direction which makes the traffic light unreachable.
-
Modifying the geometry of a node that has a traffic light on one of its segments (at the node’s point).
-
Split a segment with a traffic light on it.
-
Merge segments. In this scenario the bridge icon will not appear
-
Delete a segment with a traffic light (to perform this action the traffic light will need to be deleted first).
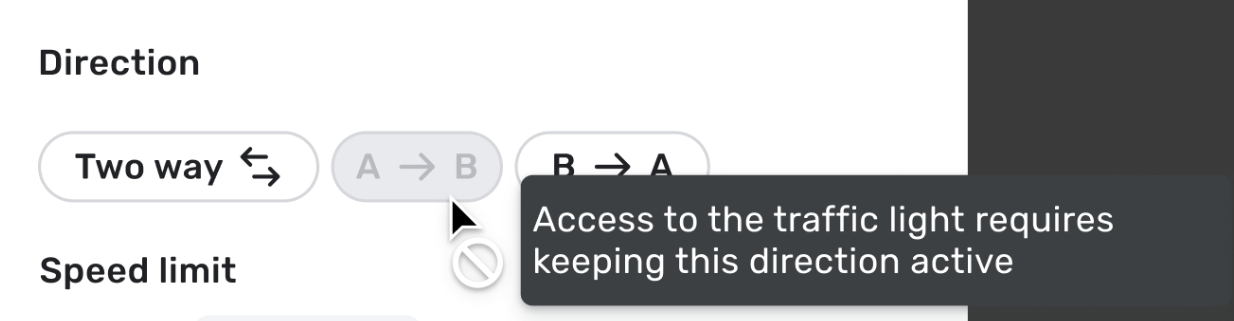
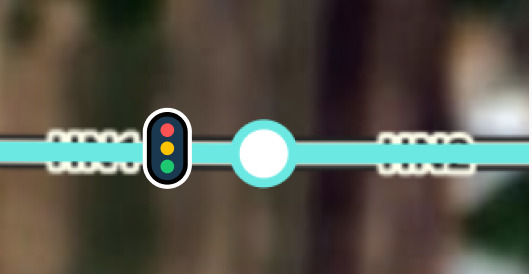
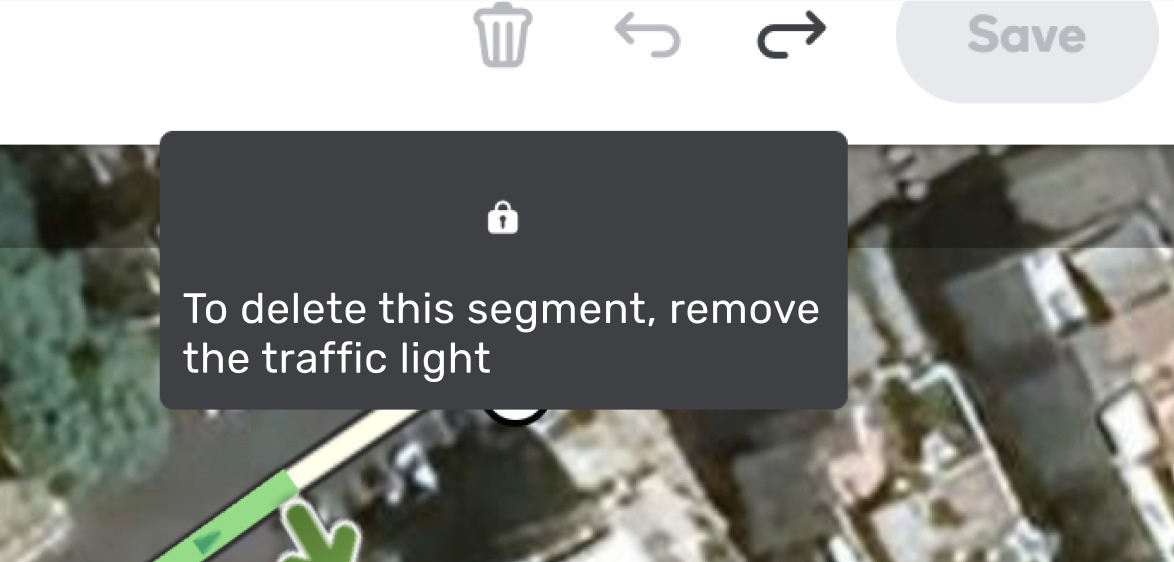
Actions that will continue to work as expected for editors with sufficient permissions:
-
Direction change of a segment to a direction which keeps the traffic light reachable.
-
Geometry changes not including the edge nodes / including edge nodes without traffic light.
-
Any change to segment attributes, such as name, speed limit, width etc.
Behavior on Client
The rollout to the Beta client, which will use traffic light data to provide enhanced guidance, is planned to begin a few weeks after the feature opens in WME Beta (we’ll keep the community updated).
Traffic lights in Navigation Mode
-
Visual Display: Drivers will see traffic lights on map to help with orientation and navigation. Traffic lights will show if affecting the driver’s route.
-
Icons: Appear only when the feature is enabled and only on the main map (not on overview screens). Traffic lights will appear below reports and above road shields
-
Capping: Drivers will see a few traffic lights ahead on route (configureable) starting a specific zoom level..
-
Voice Instructions: Audible driving instructions may reference a traffic light when giving directions, such as “At the traffic light, turn right on Oak street”.
Traffic lights in Roaming (no voice guidance):
-
Appearance: A single, centered icon will appear for approachable junctions.
-
Capping: Icon appearance will be filtered in the horizon and in specific zoom levels to reduce map clutter
Icon filtering:
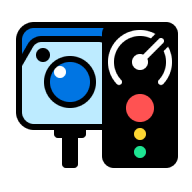
- Permanent hazard: In the case of a red light camera/combo, TL will be represented as part of the permanent hazard icon to reduce map clutter

-
Railroad Crossing: If a railroad crossing and a traffic light are on the same segment, only the railroad crossing icon will be shown.
-
Traffic Lights and Alerts
-
Traffic light would not be surfaced as other Permanent Hazard as reported ahead alerts
-
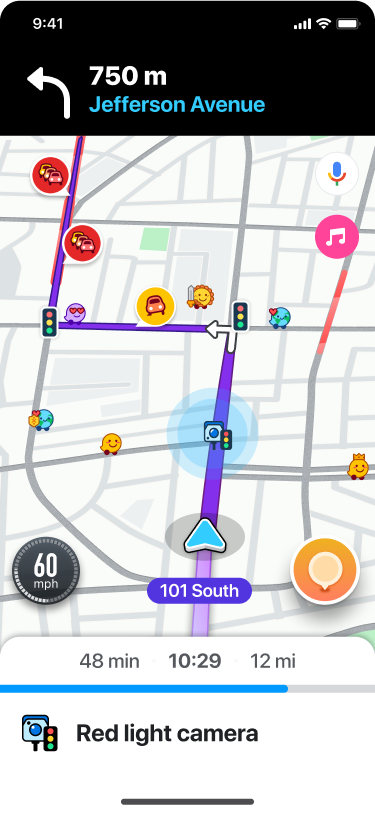
Users will continue getting Red Light cameras alerts as they usually would:
-
FAQS
Question: What happens if I merge two segments that both have traffic lights?
Answer: When merging segments, the traffic lights located at the merging point will be removed to avoid internal, invalid signals. The editor will be alerted during the merge action.
Question: What happens if I delete a segment with a traffic light?
Answer: In order to delete a segment with a traffic light, you would first need to delete the traffic light in order to delete the segment.
Question: How many editing points will I get for adding a Traffic Light?
Answer: Creating / editing / deleting a traffic light - 3 points
Question: Will traffic lights affect ETA calculations?
Answer: Not at this time. Including this data in routing and ETA models is being considered for a future phase but is currently out of scope.
Question: Can I toggle this feature off in the app?
Answer: Yes, drivers will have a setting to toggle the visibility of traffic lights on the map. Toggling off will only remove the TL from the map (not from voice instructions).
Question: Will mapped Traffic Lights appear in the app in real time, once they are added to WME?
Answer: No, they need a tile build like other map entities.
Question: I can’t see traffic lights in the app
Answer: Please check if the traffic lights were mapped in your area, if it is still not mapped it will not appear.
Question: Will the Traffic Light Serial number be surfaced in the app?
Answer: In this phase, these numbers will not be shown in the app.