Template of topic 380525, post 1
In line with our Revised Waze Editing Philosophy, our mapping standards have changed in 2020. For more information, see new technology, new mapping standards.
Introduction
A turn instruction is the combination of text, images, and spoken words that Waze provides to the Wazer, enabling the Wazer to follow Waze’s route guidance, ideally with minimal thought and without confusion.
More specifically, it informs the driver a distance or time, to turn, keep, exit, continue, u-turn and in what direction to do so. It displays visual instructions by showing what the turn angle resembles, shields used by the roads, and guidance on what lanes to use. A text-to-speech (TTS) engine also verbalises the instructions in a succinct and helpful manner.
Except for the time and distance, all other components can be customised by the editor to assist drivers and are explained in this page below.
Terminology
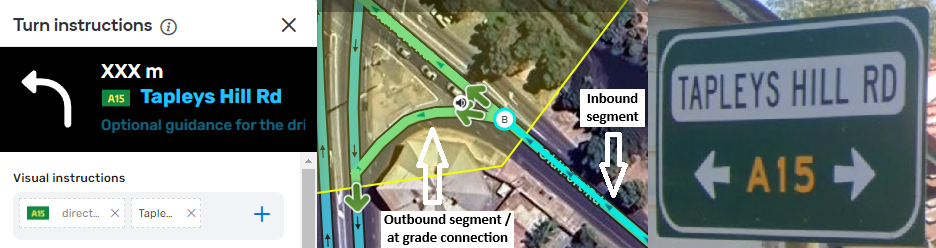
This picture illustrates the names of key points of an intersection referred to within the documentation.

Common terminology and points of reference that are helpful when mapping intersections/junctions.
This page also makes reference to Big Green Signs (BGS). This reference is inclusive of traffic signs of other colours performing the same task.

Big green signs can be blue too
Before editing turn instructions
Bringing the road and intersection “up to standard” before adding turn guidance will avoid double handling by yourself or another editor in the future, while simultaneously adding value to the app user. Before getting started:
-
Check the road is named correctly and has a city. All roads, including ramps need to include a city.
- The ramp naming standards which changed several years ago, make sure any you’re working on are up to date.
-
Align roads to the centre of the road. Where an extra lane is added for a turn or exit, align the road as if it wasn’t there.
-
Remove any micro-doglegs
-
Ramps start and end close to the gore point, just past the point the driver can legally merge
-
Add missing lane guidance and road width
-
Check the angles of the intersection will give the expected voice prompt, and if it does not, be aware you will need to override it in the turn guidance.

Lanes start and end close to the gore point of merging lanes.
Default behaviour
A turn instruction is generated automatically (when no turn guidance is applied) as follows:
- Voice prompt: The angle the inbound and outbound segments intersect with each other determines if a keep, turn, exit, and left or right is used. This setting was previously known as Turn Instruction Override (TIO) but was renamed in 2021 to align with a new turn instruction interface.
- Visual instruction: Based on the voice prompt determined above, a symbol corresponding with the turn angle is displayed.
- Shield: Where the outbound segment has a shield applied and shield number in the primary name, the shield will automatically be displayed.
- TTS: Based on the above collected information, a text-to-speech phrase is played to the driver if the setting is enabled. For example, “in 100 metres, turn left onto ‘A’ 22 Hume Highway”.
Consider the following example:

The address prefix and corresponding road shield automatically populate the shield in turn guidance.
Lanes
When lane guidance is added to turn instructions, the text-to-speech (TTS) automatically includes the instructions. For example, “In 200 metres, use the left lane to exit left onto A 31 Hume Highway.”
See the lane and far lane guidance page for specific advice.
Road width
See the Road width for specific advice.
Road shields
Shields displayed used in turn guidance must be applied to a street first. See road shields for more advice.
Turn guidance
General principles
Australia has a simplified implementation of turn guidance from that of other countries, see problems implementing turn guidance in Australia in the Discussion page for specifics. Further, it is not possible to exactly match turn instructions with big green signs. Instead, turn guidance is “inspired” by the information detailed on big green signs to improve the user experience.
You may find the community developed script, Road Shield Assistant (RSA) of assistance while mapping turn guidance.
Both distance and time are non-editable components of a turn instruction. For the respective pages for details on voice prompts (previously known as turn instruction override / TIO), lane guidance , and road width.
Permissions
Please refer to country specific permissions.
Permission is also limited to the lock level of the segment and in most cases the outgoing segment(s) lock level, similar to editing lane guidance. All editors can view the settings however.
When should turn guidance be configured?
Add custom turn guidance when signage for a particular turn includes more than just the primary street name. In particular, custom turn instructions should be added where:
- directional signage shows something other than the primary name (or shield) of the outbound segment, such is found on most exit/on ramps and wayfinders;
- there is a numbered exit; or
- a shield is desired but won’t be automatically displayed (as per the default behaviour discussed above).
![]() NOTE: a positive practice to get used to, when adding turn guidance at exit ramps, is to set guidance at the initial exit from the motorway, at the ramp fork (if instructions are given), and at the final turn (if a final instruction is given).
NOTE: a positive practice to get used to, when adding turn guidance at exit ramps, is to set guidance at the initial exit from the motorway, at the ramp fork (if instructions are given), and at the final turn (if a final instruction is given).

Example: Turn guidance set for a ramp on initial exit, fork in ramps and then final turn
How to access turn guidance in WME
The turn guidance interface can be accessed by selecting the inbound segment, hovering over the turn arrow and clicking Add/Edit Instructions:

Adding turn guidance to a turn
Guidance on turn instructions
Visual instructions
Contains the road shield and primary name of the road in the outbound segment, unless the outbound segment is a ramp, then the primary name of the road the ramp leads to is used. Where that primary name (“A15 - Tapleys Hill Rd") contains a route prefix (“A15 - “), omit it and only use the road name. Where there is a shield, it should be displayed before the road name.
For example, the inbound segment is called “Old Port Rd”, with a left turn to “A15 - Tapleys Hill Rd”. As the outbound segment is an at grade connection, the default behaviour does not apply and the shield will not be automatically displayed (as there is no shield applied or shield number in the primary name of the outbound segment). The steps to add the visual instruction would be:
- Remove the default free text field present
- Select “+” and select “Road shield”. Repeat and select “Free text”
- In the road shield box, select the matching shield for “A15”
- Leave the direction field blank (not used in Australia)
- In the free text box, type in the road name (i.e. “Tapleys Hill Rd”).
An example of how Visual instructions look in the turn instructions interface.
|
|
If you are trying to select a shield and it is not in the dropdown, zoom out and pan until you have a segment with the shield on screen. Now, try again by removing the Road shield box and add it again. |
Toward
Contains useful and relevant destinations to reassure the driver. This may include cities, locations (e.g. airport), other routes (e.g. M31 shield) or roads (e.g. EastLink). Destinations should be collected and added from the last big green sign before or at the gore point of the intersection.
Road shields are listed first and with priority over other destinations. Where there are more destinations than will fit within the towards field, include the most relevant, which is usually the closest destinations.
Technically, all destinations are “to” and this standard chooses to ignore it. Where a sign indicates “to ”, the “to” should be ignored, and destinations listed in the toward field.
Multiple destinations are to be separated by a forward slash character " / " (space before and after slash).

An example of how Towards look in the turn instructions interface.
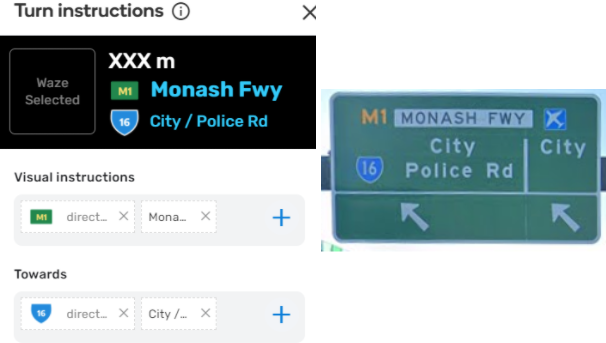
Another example of how Towards look in the turn instructions interface.
|
|
If you are trying to select a shield and it is not in the dropdown, zoom out and pan until you have a segment with the shield on screen. Now, try again by removing the Road shield box and add it again. |
Exit signs
The exit signs component is used to insert an exit number in a dedicated, fixed place. In the app, the “exit sign” is displayed in the top right corner of the turn instruction panel. Do not include the word “Exit”. Where the character limit prevents adding the full exit sign (e.g. “1 North”), directions can be abbreviated (e.g. “1N”). If the character limit is still exceeded, flag it with a map comment and refer it to your State Manager.
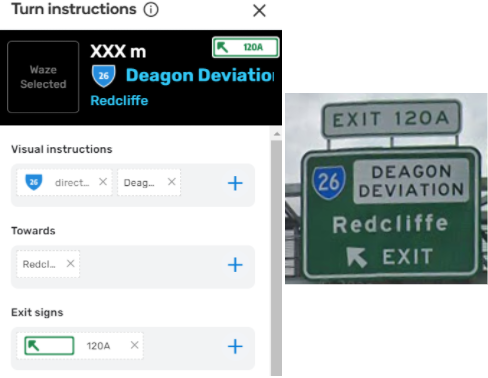
An example of how Exit signs look in the turn instructions interface.
Where a BGS indicates a turn connects with a toll road, a yellow exit sign with the word “Toll” should be used. Please ensure you use the correct case i.e. not “toll” or “TOLL”, but instead use “Toll”.

An example of how to map a toll road shield on a big screen sign.
Text-to-speech (TTS)
The TTS field allows the override of the street name component of the instruction. Authorised abbreviations also work here. Unless you need to produce a more conversational instruction (examples below), you do not need to change or edit this.
Click the microphone symbol to listen to how the TTS text entered will sound in the app.
Permitted TTS updates:
-
 Small adjustments can be made to produce a more conversational instruction. For example, add “the” before the name of a destination that is normally preceded by “the” (e.g. “Marsh St to the Airport”).
Customising the TTS to talk conversationally.
-
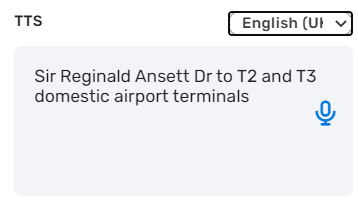
At potentially busy and complex destinations where the driver needs extra reassurance, such as at the airport or stadiums, TTS may be adjusted to direct the driver to hyper-local destinations (e.g. “Arrivals for terminal 2 and 3”).
TTS being changed to include hyper-local specifics about the destination.

Not permitted TTS updates:
 Do not use this field to change pronunciations. Submit a TTS change request through the WME interface, ask in the #tts channel on Discord or contact a Local Champ to request a change of the TTS pronunciation for the whole country.
Emojis
In Australia, the following emojis are permitted for use in turn guidance. Their purpose is to provide an internationally recognisable symbol and save space in the instruction fields.
Permitted Emoji Characters in Australia| Emoji / Symbol | Intended Use |
|---|---|
| ✈️ | Represents an airport or aerodrome. However, this symbol should never be used to represent military installations. |
| 🅿️ | Represents vehicle parking of all types. |
The emojis can be copied and pasted from the above table, or go to the website linked and use the convenient copy and paste function there.
Rules for use of emojis
- These emojis must never be used in a primary or alternative street name. They are only permitted for use in the “visual instruction” and “toward” fields of turn guidance.
- The emojis are to be used on their own and not in conjunction with other words. For example, never use “Brisbane
 ”. Instead, it should simply just appear as “”, separated by a separating forward slash character / if necessary.
 - See above Toward section, in the discussion of what to include in the toward field. If the inclusion of an airport or aerodrome in the list is not warranted, it is okay not to use the emoji. These emojis are not essential for inclusion in every case, only if they are relevant.
- Emojis must always be the last item to appear in the fields; so they always appear on the right of any instruction.
Turn guidance with junction boxes
Turn guidance can also be applied to junction boxes. Care should be taken to avoid blindly deleting a junction box without checking and noting the applied turn guidance. You may end up having to answer to a grumpy peer why you deleted their work!
Where turn guidance exists within a junction box it should be applied to the underlying intersection node in all cases.

Turn guidance is applied to the underlying intersection node
There will be times when there are:
- too many signs,
- too much information,
- the road is major, or
- the infrastructure is complex.
In these rare circumstances, a junction box can be applied and turn guidance applied to the junction box exit instead. This has the advantage of displaying only the relevant turn guidance for the route through the complex intersection instead of all possible information. Due to the restrictive nature of junction boxes, this is not recommended as common place practice.
NOTE: If turn guidance also exist on the junction box exit and underlying intersection node, Waze will use the underlying intersection node. As such, if you need to change turn guidance based on entry to junction box, you must first remove the guidance on the intersection node and replace it at the junction box exit. Such complex junction boxes should be marked with a map comment bringing it to the attention of other editors, and may be locked to a higher level to avoid accidental deletion.
Below are two examples:
Known limitations
- It is not currently possible to map two shields to the one street ID
- There is not enough space on the screen to display all the info from BGS and so we don’t try to.
- Not all the shields we requested have been implemented yet
- Changes to settings like character limits we requested have not been implemented yet
- Inheritance of turn guidance might occur in the future. We do not know. Any possible future implementation may impact in unforeseen ways.